


目次
前提
本手順では CentOS8 Stream 上に CRC OpenShift クラスターと 3scale を導入する手順を前提としています。3scale のインストールは OpenShift コンソールのオペレーターを使用する方法で導入するため、GUI が使える環境のターミナルから操作をする必要があります。
CRC OpenShift と Pull Secret の導入と起動
CRC OpenShift と Pull Secret の入手
CRC OpenShift と pull secret を Red Hat 社のサイトからダウンロードします。このとき、Red Hat 社のサイトにアカウントを作る必要があります。アカウント作成に特に費用は掛かりません。アカウントを作ってログインすると、以下のような画面からダウンロードできます(2022/6 時点のアクセスであるため、今後ページのデザインなど変わる可能性があります)。
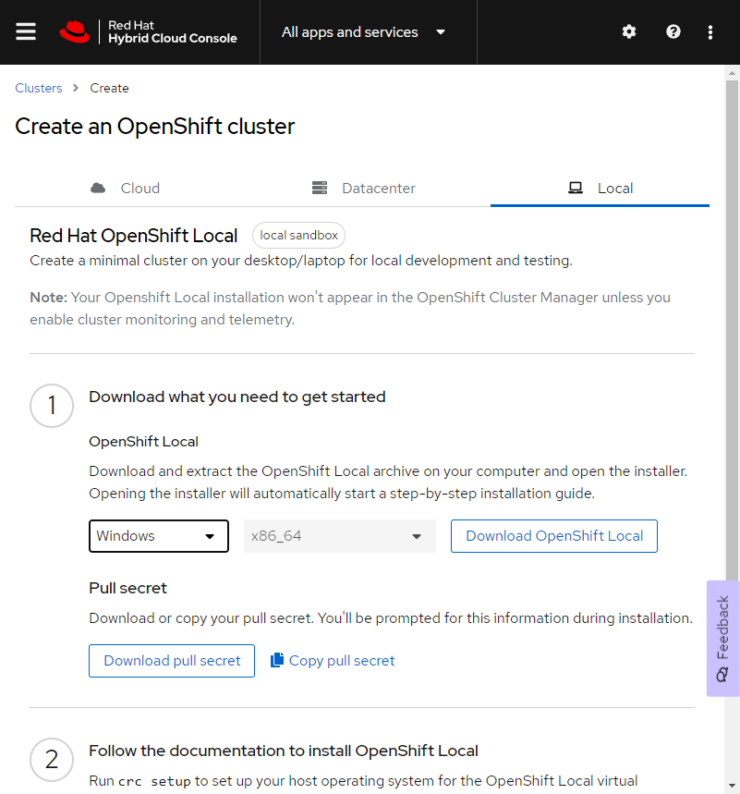
インストール先の OS にあったファイルをダウンロードします。この例では CentOS8 Stream を使用しているため、Linux 版のファイルをダウンロードしています。
CRC と Pull Secret の導入から起動まで
ダウンロードした圧縮ファイルを展開し、crc をインストールします。Linux の場合はインストール時に root ユーザー以外の一般ユーザーを使用してください。
$ ./crc-linux-2.4.1-amd64/crc setupなお、この時にメモリが足りないと以下のようなメッセージが出てインストールできません。
$ ./crc-linux-2.4.1-amd64/crc setup
CRC is constantly improving and we would like to know more about usage (more details at https://developers.redhat.com/article/tool-data-collection)
Your preference can be changed manually if desired using 'crc config set consent-telemetry <yes/no>'
Would you like to contribute anonymous usage statistics? [y/N]: N
No worry, you can still enable telemetry manually with the command 'crc config set consent-telemetry yes'.
INFO Using bundle path /home/admin/.crc/cache/crc_libvirt_4.10.14_amd64.crcbundle
INFO Checking if running as non-root
INFO Checking if running inside WSL2
INFO Checking if crc-admin-helper executable is cached
INFO Caching crc-admin-helper executable
INFO Using root access: Changing ownership of /home/admin/.crc/bin/crc-admin-helper-linux
INFO Using root access: Setting suid for /home/admin/.crc/bin/crc-admin-helper-linux
INFO Checking for obsolete admin-helper executable
INFO Checking if running on a supported CPU architecture
INFO Checking minimum RAM requirements
crc requires at least 9.664GB to run
$
このような場合は割当てメモリを増やします。以下の例では割当てメモリを 16GB (16 * 1024 = 16384) としました。設定した内容は crc config view コマンドで確認できます。
$ ./crc-linux-2.4.1-amd64/crc config set memory 16384
Changes to configuration property 'memory' are only applied when the CRC instance is started.
If you already have a running CRC instance, then for this configuration change to take effect, stop the CRC instance with 'crc stop' and restart it with 'crc start'.
$ ./crc-linux-2.4.1-amd64/crc config view
- memory                                : 16384
$
crc setup を実行します。出力の最後の方にありますが、約 3GiB, 13GiB といったファイルをダウンロードするのでディスクの空き容量にも注意してください。
$ ./crc-linux-2.4.1-amd64/crc setup
INFO Using bundle path /home/admin/.crc/cache/crc_libvirt_4.10.14_amd64.crcbundle
INFO Checking if running as non-root
INFO Checking if running inside WSL2
INFO Checking if crc-admin-helper executable is cached
INFO Checking for obsolete admin-helper executable
INFO Checking if running on a supported CPU architecture
INFO Checking minimum RAM requirements
INFO Checking if crc executable symlink exists
INFO Checking if Virtualization is enabled
INFO Checking if KVM is enabled
INFO Checking if libvirt is installed
INFO Checking if user is part of libvirt group
INFO Adding user to libvirt group

(途中省略)

INFO Checking if libvirt 'crc' network is available
INFO Setting up libvirt 'crc' network
INFO Checking if libvirt 'crc' network is active
INFO Starting libvirt 'crc' network
INFO Checking if CRC bundle is extracted in '$HOME/.crc'
INFO Checking if /home/admin/.crc/cache/crc_libvirt_4.10.14_amd64.crcbundle exists
INFO Getting bundle for the CRC executable
INFO Downloading crc_libvirt_4.10.14_amd64.crcbundle
3.15 GiB / 3.15 GiB [--------------------------------------------------------------------------------------] 100.00% 14.63 MiB p/s
INFO Uncompressing /home/admin/.crc/cache/crc_libvirt_4.10.14_amd64.crcbundle
crc.qcow2: 12.61 GiB / 12.61 GiB [---------------------------------------------------------------------------------------] 100.00%
oc: 117.14 MiB / 117.14 MiB [--------------------------------------------------------------------------------------------] 100.00%
Your system is correctly setup for using CRC. Use 'crc start' to start the instance
$
次に crc start を実行します。このとき、先の手順で入手した secret を使用するため、コマンドオプションで -p pull-secret.txt を付けます。
$ ./crc-linux-2.4.1-amd64/crc start -p ./pull-secret.txt以下のような出力がでます。途中 OpenShift の cluster 準備に時間が掛かり過ぎて Error が出ていますが、時間が解決する問題と思われるためそのまま作業を進めます。
$ ./crc-linux-2.4.1-amd64/crc start -p ./pull-secret.txt
INFO Checking if running as non-root
INFO Checking if running inside WSL2
INFO Checking if crc-admin-helper executable is cached
INFO Checking for obsolete admin-helper executable
INFO Checking if running on a supported CPU architecture
INFO Checking minimum RAM requirements
INFO Checking if crc executable symlink exists
INFO Checking if Virtualization is enabled
INFO Checking if KVM is enabled
INFO Checking if libvirt is installed

(途中省略)

INFO 2 operators are progressing: network, openshift-controller-manager
INFO 2 operators are progressing: network, openshift-controller-manager
INFO Operator openshift-controller-manager is progressing
INFO Operator openshift-controller-manager is progressing
INFO 2 operators are progressing: kube-apiserver, openshift-controller-manager
INFO 2 operators are progressing: kube-apiserver, openshift-controller-manager
INFO 2 operators are progressing: kube-apiserver, openshift-controller-manager
INFO 2 operators are progressing: authentication, openshift-controller-manager
INFO Operator openshift-controller-manager is progressing
INFO Operator openshift-controller-manager is progressing
INFO Operator openshift-controller-manager is progressing
ERRO Cluster is not ready: cluster operators are still not stable after 10m6.262104s
INFO Adding crc-admin and crc-developer contexts to kubeconfig...
Started the OpenShift cluster.

The server is accessible via web console at:
  https://console-openshift-console.apps-crc.testing

Log in as administrator:
  Username: kubeadmin
  Password: xxxxx-xxxxx-xxxxx-xxxxx

Log in as user:
  Username: developer
  Password: xxxxxxxxx

Use the 'oc' command line interface:
  $ eval $(crc oc-env)
  $ oc login -u developer https://api.crc.testing:6443
$
crc start 処理出力の最後にあったガイドラインのコマンドを実行します。手元の環境では crc バイナリコマンドに PATH を通していなかったため、/usr/local/bin の下に crc バイナリファイルをコピーして対応しました。
$ eval $(crc oc-env)
bash: crc: コマンドが見つかりませんでした...
$ echo $PATH
/home/admin/.local/bin:/home/admin/bin:/usr/local/bin:/usr/bin:/usr/local/sbin:/usr/sbin
$ sudo cp -p ./crc-linux-2.4.1-amd64/crc /usr/local/bin/
$ eval $(crc oc-env)
$
任意ですが、次回ログイン時のシェルでも oc コマンドを有効にするために、以下のように ~/.bashrc などに設定をしておくと便利かもしれません。
$ tail -n 2 ~/.bashrc
# User specific aliases and functions
eval $(crc oc-env)
$
3scale の導入
レジストリーサービスアカウントの作成
3scale の導入は基本的に Red Hat 社のドキュメントを参照して作業を進めていきます。
はじめに Red Hat 社のレジストリーサービスアカウントが必要になるため、ドキュメントに従ってアカウントを作成しておきます。この作業で、レジストリーサービスアカウント作成時にトークンなどが払い出されます。
コンテナーレジストリー認証の設定
3scale のデプロイ方法は、yaml テンプレートを使用した OpenShift への 3scale デプロイと、オペレーターを使用した方法の2つがありますが、どちらの手順でも後述するコンテナーレジストリー認証設定が必要になります。
管理者として OpenShift クラスターにログインします。
$ oc login -u kubeadmin https://api.crc.testing:6443
Logged into "https://api.crc.testing:6443" as "kubeadmin" using existing credentials.

You have access to 64 projects, the list has been suppressed. You can list all projects with 'oc projects'

Using project "default".
$
3scale をデプロイするプロジェクトを作ります。
$ oc new-project 3scale-poc-project
Now using project "3scale-poc-project" on server "https://api.crc.testing:6443".

You can add applications to this project with the 'new-app' command. For example, try:

    oc new-app rails-postgresql-example

to build a new example application in Ruby. Or use kubectl to deploy a simple Kubernetes application:

    kubectl create deployment hello-node --image=k8s.gcr.io/e2e-test-images/agnhost:2.33 -- /agnhost serve-hostname

$
3scale をデプロイするプロジェクトが選択されているか、念のために確認します。oc project コマンドで意図したプロジェクトにアスタリスク(*)のマークが付いていることを確認します。別なプロジェクトになってしまっている場合は、oc project [プロジェクト名] コマンドで切り替えます。
$ oc projects
You have access to the following projects and can switch between them with ' project <projectname>':

  * 3scale-poc-project
    default

(途中省略)

    openshift-vsphere-infra

Using project "3scale-poc-project" on server "https://api.crc.testing:6443".
$
docker-registry (registry.redhat.io) の secret を作成します。registry.redhat.io の詳細についてはこちらのドキュメントを参照ください。
oc create secret docker-registry threescale-registry-auth \
  --docker-server=registry.redhat.io \
  --docker-username="サービスアカウントの username" \
  --docker-password="サービスアカウントの token"
このとき、サービスアカウントのユーザー名は “xxx|xxx” という形式になっているため、username や token をダブルクォートで囲ってシェルに情報を渡さないと、シェルがコマンド内容を解釈できずエラーになるので注意してください。以下は実行例です。正常に secret が作成されれば、”secret/threescale-registry-auth created” という出力が得られ、oc get secret コマンドで当該 secret が確認できます。
$ oc create secret docker-registry threescale-registry-auth \
>   --docker-server=registry.redhat.io \
>   --docker-username="xxxxxxx|xxxxxxxx" \
>   --docker-password="xxxxxxxxxxxxxxxxxxxxxxxxxxxxxxxxxxxxxxxxxxxxxxxxxxxxxxxxxxxxxxxxxxxxxxxxx"
secret/threescale-registry-auth created
$ oc get secret | grep three
threescale-registry-auth   kubernetes.io/dockerconfigjson        1      5m52s
$
3scale をオペレーターでインストール
GUI が使える環境のターミナルから以下の crc console コマンドを実行します。このとき、ブラウザが起動してデフォルトは developer のユーザーでログインが促されるかもしれませんが、administrator の kubeadmin でログインをします。kubeadmin でログインしないと OperatorHub のメニューが表示されません。
crc console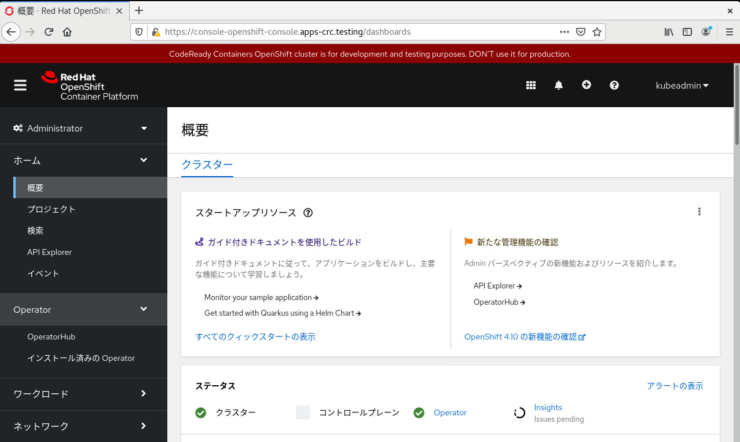
画面左側にある OperatorHub を選択し、3scale を検索します。
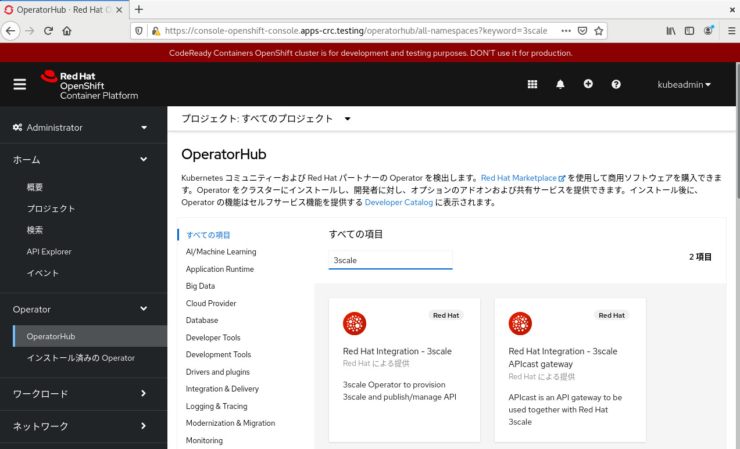
3scale (上記画面の左側、3scale APIcast gateway ではない方)を選択し、インストールボタンを押します。
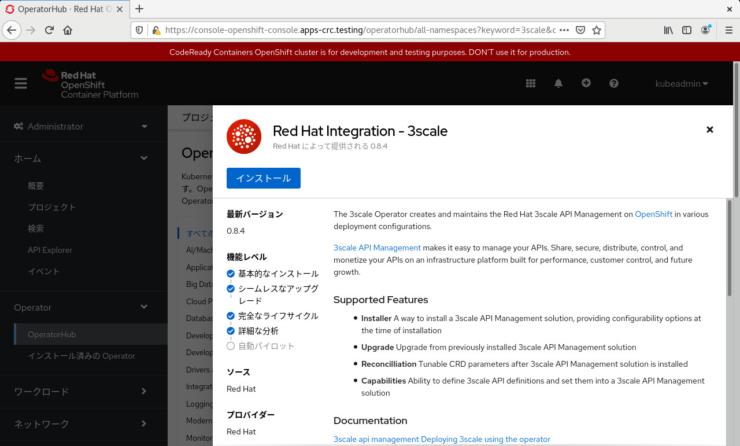
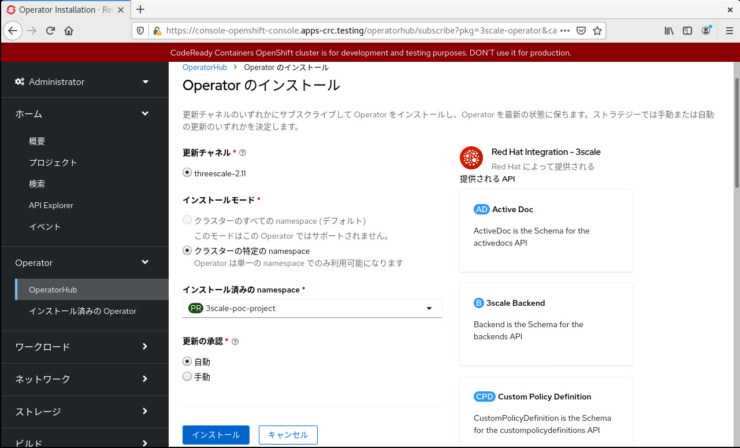
Operator のインストール画面において、インストールモードは「クラスターの特定の namespace」を選択し、前述の手順で作成したプロジェクト名(この例では 3scale-poc-project)を選択します。更新の承認は「自動」にしておきます。そして、インストールボタンを押します。
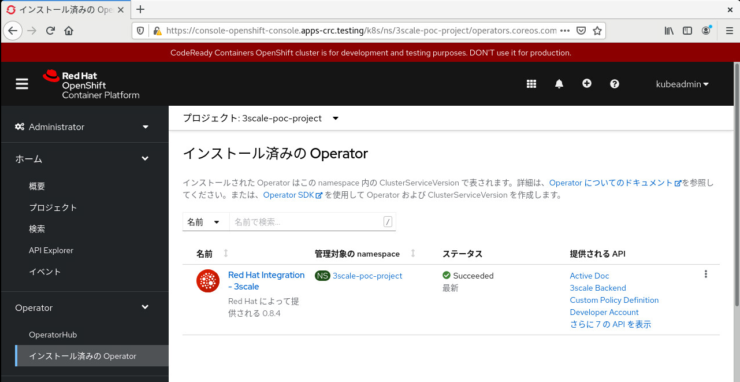
インストールが終わると、画面左側の「インストール済みの Operator」メニューの画面で 3scale が表示されます。
作業は以上です。お疲れ様でした。